

It is useful to keep in mind that a do-it-yourself rat trap can be even more effective than standard purchased products - this fact has been repeatedly confirmed in practice. A typical example is when the rats bypass the usual mousetrap, feeling that this device is fraught with danger, but quickly fall into the trap of a new design that is not yet familiar to them.
At the same time, it is not necessary to craft something complicated, bulky, and requiring serious skills to capture a pest. It is known that everything ingenious is simple, and rattraps assembled by hand from improvised materials are the best confirmation of this: the lack of expensive parts, time or skills here is compensated by the inventiveness of the creator and the ingenuity of the design itself.
As you will see below, a very effective trap can be assembled in just a few minutes from ordinary plastic bottles, buckets or pans, and there are many options for such traps.

The following are descriptions of the 8 most effective simple home-made rat traps and illustrative examples of their work in practice are shown ...
Option # 1: Tipping Trap
The principle of operation of this design is that the animal, getting close to the bait, falls into the trap. There are many ways to implement this mechanism.
Here is the simplest one:
- Make a tunnel out of cardboard (you can also use a piece of a wide plastic pipe);
- Put it on the edge of the table so that half of the tunnel hangs over the edge (it is useful to lightly attach it with tape to the table so that the rat cannot move);
- At the very edge of the tunnel put a bait;
- Place a barrel or a deep bucket under the site of the intended tipping over.

The animal, attracted by the smell of the bait, will climb the tunnel, at the edge of the table it will overturn it and, together with it, will fall into the container. The video below shows how this happens:

Agree, what could be easier?
There may be several options for making such a home-made rat trap. For example, a tipping bridge can be placed directly on the edge of the bucket, and a ladder can be brought to it:

You can use a piece of whatman paper with slots to cover the bucket. The rat climbs onto the whatman behind the bait and falls through the slots into the bucket:

On a note
If a bucket or can is used to catch a rat, then it is useful to pre-pour water in them - without water, the animal will easily jump out of the trap. In addition, it will be easier to catch a pest in the water (just remember to wear tight construction gloves before doing this).
By the way, a mousetrap working on the same principle can be made with its own hands from a plastic bottle. In this case, a bottle with an open neck is placed on the edge of the table (or a special inlet can be made), a bait is placed in it, and the bottle is tied with a thread to something heavy on the table itself. The mouse climbs into the bottle, halfway to the bait, overturns it with its weight, and the entire trap with prey hangs on a string:

On a note
You won’t be able to catch a rat in a bottle - the animal will easily jump out of the overturned trap. Unless, as an option, you can make a tunnel from a bottle like the paper considered above, cutting off the bottom and neck of it, and then catch the pest in a bucket or barrel.
Option number 2: rat traps from plastic bottles
The traditional version of this trap looks like this:
- The upper part is cut in the bottle, it opens slightly, a long rod is attached to it, to which, in turn, a tourniquet is attached, playing the role of a spring;
- Near the bottom of the bottle through the hole in the wall, a trigger is attached to which the bait is attached;
- The door from the neck of the bottle is pulled by a bundle to the body of the bottle - this will allow it to slam when the animal pulls on the bait.

The capture is simple: the rat gets into the bottle, pulls the bait - and the gum slams the door. Everything, the animal is caught. The video shows how this design works and how to assemble it:
And here is another example of a simple but highly effective rat trap that can be easily made with your own hands from a plastic bottle:
- The bottle is strung on a rod (for example, on a thick wire);
- Then outside the bottle is coated with bait - sour cream, porridge, stew;
- The core is placed on the edges of the bucket or barrel;
- A bridge from the board is brought to the bottle.
Then everything is simple: the rat climbs along the bridge to the bottle, climbs on it to lick the bait, the bottle scrolls, and the animal falls into the bucket. Like this:
A similar design can be made from a bucket and a beer can. The following photo shows a corresponding example:

The disadvantage of rat traps with a spinning bottle (or a can) is that they are bulky - at home it is not always convenient to use them.
It’s easier with mice - for lovers of beautiful solutions, a compact mouse trap was invented from a plastic bottle, which, if desired, can be placed under a table or in a closet. The video below shows how to assemble such a trap from improvised means:
The main thing in this design is to correctly guess at the center of gravity of the bottle.
If you take a suitable bottle, then a rat trap can be made from it by the same principle. It is only important to keep in mind that the animal, if there is enough time, can try to gnaw through the walls of the trap and thereby get out of it.
Option No. 3: covering live trap
This is perhaps the simplest version of a makeshift rat trap. To catch a rat or mouse with it, it is enough to take a saucepan and a coin of suitable size - turn the saucepan upside down, tilt it slightly and rest one edge of it on a coin placed on the edge.
A bait is placed under the pan. When the rodent climbs behind the bait, it will certainly touch the coin, it will tip over and the pan will cover the animal.
Here is an example implementation where instead of a pan a jar is used:


The design flaw is the frequent false positives (when the rat touches the container or coin, not yet climbing inside the rat trap).
More sophisticated home-made traps of this type are an advanced “coin box”. For example, you can rest the container in an unstable stand, tie a thread to the stand, transfer the thread through the spacer in the container and attach the bait to it:

The rat will slip under the tank, pull the bait and slide the gatehouse.
Another option is to use a strip of cardboard of sufficient height with a special corner for the lure head instead of a coin:

Here, the animal, pulling the bait, overturns the cardboard and covers itself with a trap.
It is only important to keep in mind that for the manufacture of home-made rat traps, you need to take a sufficiently heavy container so that the rat can not move it.
The video below shows another interesting example of such a rat trap:
Option number 4: cell traps
Such designs are characterized by high reliability, durability and efficiency, but they are quite difficult to do yourself. For their manufacture, special materials and details are needed: the case itself is made of durable steel mesh, metal or wood panels, and the trigger mechanism is implemented on the basis of a spring. However, with sufficient desire and dexterity, assembling such a device with your own hands will not take much time.

The principle of operation of the rat trap is as follows:
- The cage has a rising door with a gatehouse - in a wary state, the trap door opens upward with a spring tension;
- At the end of the cage, a bait is attached to the hook; the other end of the hook holds a gatehouse;
- When the rat pulls the bait, the gatehouse descends and the door slams.
The video below shows examples of manufactured rat traps of this type:
Option number 5: tunnel trap
The inlet of the tunnel rat trap is made in the form of a valve with sharp petals. The principle of operation of such a device is as follows:
Such structures are often used to catch courts, mice and rats in garden areas - in this case, the structure is made of a piece of pipe, at each end of which a valve is installed. Then the trap is installed in the underground mole. As a result, it does not matter which side the mole (or rat) approaches the trap - the animal will still be caught.
Here's another example of a trap of this type:
Option number 6: snare
Generally speaking, catching rats with snares is quite problematic due to the small size of the animals. However, if you try, you can still catch the pest, and there is even a small life hack that allows you to make such a rat trap with your own hands from improvised means.

To do this, you need:
- Cable tie;
- A piece of fishing line;
- Heavy load - for example, a wrench;
- Paper clip;
- Bait - for example, a crust of bread.
This is how a homemade cable tie rat trap works in practice:
On a note
In the manufacture of this trap, it is important to choose the right weight. If it is too small, it will not tighten the screed with the necessary effort, and the rat will run away. If the load is too heavy, then using such a structure as a live trap will not work - the animal will break its ribs with a loop.
Option 7: Zürner trap
This classic trap works on the same principle as the tipping rat traps described above. Its difference lies only in the completeness of the design and appearance: the Zürner trap is a wooden house with two entrances, in which in the middle of the “corridor” there is a bait, and the floor on both sides of it is made of boards with hinges. When the animal approaches the bait, the board falls under its weight, the animal falls into a large closed chamber, after which the board on the hinge returns to its original position.
The figure below shows a diagram of such a rat trap:

Thanks to its successful design, Zürner's trap manages to catch several rats at once.
As a rule, such a trap is made independently of wood, since the release of Zürner traps is not established by industry. Despite the effectiveness and certain advantages, the Zürner trap is rarely used in practice - largely due to the complexity of manufacturing.
Option number 8: glue rat trap
On sale today there are ready-to-use adhesive traps for rodents. However, often such a trap is prepared independently.

A glue rat trap is made simply: a special glue for rodents is taken (for example, RaTrap, Alt, EuroGuard), a piece of cardboard is smeared with it, in the middle a bait is placed on it. The rat, attracted by the smell, tries to get the bait and rises with at least one paw on the glue. Realizing that she can’t peel off, she starts frantically trying to break free, puts other paws in glue or even sticks her head. After that, she can no longer get out.


If the rat is not freed, then it will die of thirst in only a few days. This is the main disadvantage of glue traps: it is often necessary to throw such a rat trap with a still living rodent (sometimes periodically screeching), which is especially difficult for impressionable people to do.
On a note
A significant drawback of glue traps for rodents is also the possibility of pets entering them - a cat or dog can easily get dirty in glue. To wash off the sticky mass is very problematic, it is easier to cut off the sticky piece of wool.
And also a few words about the commercially available lethal rat traps (traps)
All the self-made rat traps described above have an important feature - they allow you to catch the animal alive (the so-called live traps).
However, rats can also be effectively controlled using industrial trap traps that will kill rats. For example, among the most popular, the following can be noted:
- Standard trap-crush (popularly often called a mousetrap) - it can have several modifications;
- Tunnel trap of the type Clean Kill Mouse Trap from Victor;
- Electric rat trap (they work on batteries, and there are models that automatically put the killed rat in a special compartment, allowing you to kill several rodents in one night).


In conclusion, it is worth noting that the effectiveness of a particular trap, whether it is home-made or industrial production, largely depends on the correct choice of bait. Read more about choosing lures in a separate article: The best lures for rats and mice.
Useful video: a good example of the operation of an electric rat trap
Original wire rodent trap
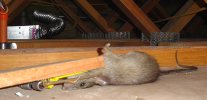
Practice shows that if a rat is wound up in a house, and even more so a few rats, then they themselves will not leave, and will constantly appear in the kitchen ...
When it comes to rat traps, many people associate with a standard crush die (they are also called a mousetrap). D ...
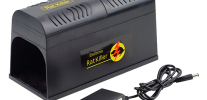
Many have heard about electric rat traps, but not everyone fully understands how these devices work, how effective they are ...